Six main markers (M1 - M6) are provided and each of these markers can be split to form a marker pair (Main Marker + Complement), making a total of 12 markers available for measurement, bookmarking and other purposes. Complement markers are always displayed in the reverse color of their main marker and may also display a lower case 'c' after the marker number.
The benefits from using DigiView's markers start to become obvious when seeing the variety of available uses:
▪Measure time from an edge of a signal.
▪Measure time from the Trigger Point (also see Marker Time/Delta).
▪Measure time from its complement marker or from any other marker (also see Marker Time/Delta).
▪Bookmark specific spots in the capture and jump to those spots with a single click or keystroke (see Quick Select Flags, Key Functions), .
▪Bookmark a time span in the capture to quickly scroll and zoom that period into view with a Double-Click or keystroke (see Marker Time/Delta, Key Functions).
▪Snap to the Previous or Next change in a signal and scroll that point to the Center of the screen (@).
▪View the value of multiple signals at the marker's time in the Marker Column.
▪Scroll a waveform vertically into view when activating its assigned marker.
▪Mark a time span for exporting (see Exporting).
▪Automatically scroll to and mark the result of a Pattern Search function or a specific stage of a Sequential Search function (also see Auto Search Windows).
The most convenient access to markers and their options is the Quick Select Flags in Waveform Views. Perform single-click jumping, placement by dragging, splitting, clearing and activate marker menus from these flags.
Markers are global to the application, so any changes will be reflected throughout the program. The only exception to this rule is the marker that is currently active in a particular Waveform View. Each Waveform View maintains its own status of which marker is the local "active marker". Each signal's value that corresponds to the active marker's position in a Waveform View is displayed in the marker column.
The Active Marker
The Active Marker is the marker currently being used or selected. Dragging a marker, jumping to a marker, changing its options or performing a search will automatically set the marker involved as the Active Marker.
Items affected in Waveform Views when a marker becomes the Active Marker:
▪Quick Select marker flag highlights.
▪Marker Flag highlights and is brought in front of other flags.
▪The Marker Column reflects each signal's value at the Active Marker's time.
▪The time displayed at the top of the Marker Column is the time from the Active Marker to the Center Time of the Waveform View (@).
▪The time displayed at the top of the Marker Column is highlighted using the color of the Active Marker.
▪The Snap Marker buttons at the top of the Snap Signal Column changes to the same color as the Active Marker.
▪A right or left click on the Snap Marker buttons will snap the active marker to a signal edge if the marker is assigned to a signal.
▪The static measurements will display for the active marker in full color and on top of any other visible marker measurements.
▪When the Active Marker is moved or snapped to an edge it will display the time from its last position to its new position. If split, it will display the time from the position of its complement instead.
▪If "Scroll-n-View" is enabled and the Active Marker is assigned to a signal, the assigned signal's waveform will scroll into view if not already visible.
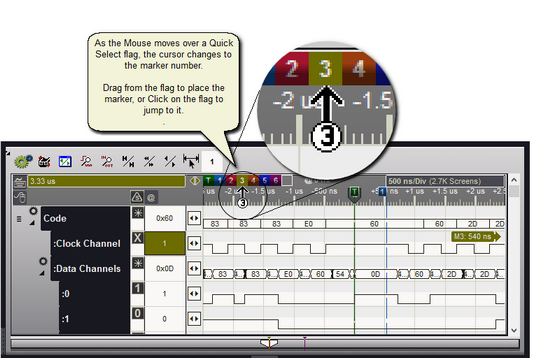
The Quick Select Flags
The Quick Select flags are located in the upper left corner of all Waveform Views. From these flags you can jump to a marker's position with a single click, place a marker, split a marker to create a tethered pair (creates the "complement"), clear a marker and open the marker menus.
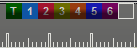
These flags use the same colors as those defined for markers in the Color Theme. The active one is always highlighted as displayed for Marker number one above (referenced as 1 or M1).
Dragging from these flags will bring the marker to the current screen position and make it visible if necessary.
Clicking on one of these flags will automatically scroll the waveform view to the markers position and center it in the waveform window. This can also be referred to as "Jump to Marker".
The last flag (after the flag for M6) is a Global Flag that affects all markers. A Left-Click on this flag will clear all markers including marker complements. A Right-Click will open the Global Marker menu.
Quick Select Mouse and Key Functions
▪Left-Click - Scroll the position of the marker to the Center of the screen (@).
▪Click-n-Drag - Activates and brings the marker to the mouse when the drag begins. Position the marker for placement before releasing the mouse.
▪Right-Click - Opens the Menu for this marker.
▪Control Key + Click - Scrolls to the position of the main marker's complement. If not already split, the marker will be split and the complement placed at the Center of the screen.
▪Control Key + Click-n-Drag - Activates and brings the marker's complement to the mouse when the drag begins. Position the complement marker then release the mouse when ready. If the main marker was not already split into the main/complement pair, it will automatically split so the complement can be brought to the mouse position when the drag begins.
▪Control Key + Right-Click - Opens the Menu for this marker's complement. If not already split, the marker will be split and the complement placed at the Center of the screen before the menu opens.
▪Mouse Move - When the mouse moves over a flag, the associated marker's flags will highlight and display on top of other marker flags.
▪Control Key + Mouse Move - Activates the associated marker as the "Active" marker, but does not scroll to its position. The marker's flags will highlight and display on top of other marker flags.
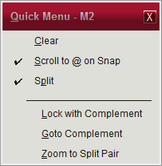
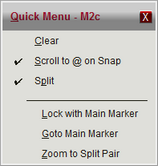
Activate a marker's menu by a Right-Click on the Marker Flag. You can also use the Quick Select flags to activate this menu, but to access the menu of a marker's complement from the Quick Select flags, use Control-Key + Right-Click. The menu for M2 and the menu for it's complement are displayed above.
▪Clear - Disables and removes the marker from view. If split, the complement is also cleared.
▪Scroll to @ on Snap - Toggles the marker "tack" or "sticky" state. When enabled, the marker will always bring the point of placement to the center of the screen (@). This will occur whenever the marker is placed on a signal, dropped in the Division tick area or snapped to a signal's edge.
▪Split - When enabled, the marker is split into a pair of tethered markers. We refer to the original marker as the Main Marker and the newly created marker as its Complement. When split, the static measurement for the marker will measure the time between the marker and it's complement instead of tracking it's last position. Quick select flags will have two "dots" above the marker number to indicate the split. The complement marker is always displayed in the inverted colors of it's main marker and has a lower case 'c' appended to its designator in many cases. Disable this option to clear the complement.
▪Lock with Complement / Main Marker - This option is available after splitting a marker. Enable this option to lock the distance between a main marker and it's complement. Dragging, snapping or placing either marker will also move the other but the distance and order will remain the same. When locked, the Quick Select flags will connect the two dots above the marker number to indicate the pair is locked. Disable this option to unlock the pair and allow each to move independently.
▪Goto Complement / Main Marker - This option is available after splitting a marker. Click this option to jump to the position of the other marker in the pair. If you opened the menu for the complement, you will jump to the location of the main marker.
▪Zoom to Split Pair - This option is available after splitting a marker. Click on this option to bring both markers into view. First, the Waveform View will Zoom to a resolution that fits the time span of the marker pair, then it will scroll that time span to the center of the window (@). If the Center indicator (@) is not centered, drag it to the center to see both markers.
Global Marker Menu
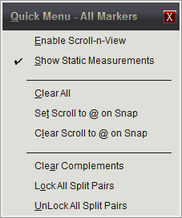
The Global Marker Menu affects all markers. The first two items are global settings that involve markers and the remaining items change the settings of the actual markers.
▪Enable Scroll-n-View - Enable this feature to have a waveform scroll into view whenever you activate the marker last assigned to it. This can be beneficial if you are analyzing multiple waveforms that can not be viewed in the screen area at the same time and do not want to manually scroll each into view as you jump back and forth between them. If you are using the markers to jump to multiple time points, when you click on the marker the position will horizontally scroll to the marker and the waveform will vertically scroll to display the signal's waveform.
▪Show Static Measurements - When enabled, marker measurements are always visible on the screen based on Environment options. Disable this option to temporarily hide these measurements (see Environment Settings).
▪Clear All - Click on this item to clear all markers including their complement. When cleared, the markers are no longer visible and each marker's options are reset.
▪Set Scroll to @ on Snap - This will enable the "Sticky" function of all enabled markers. This can also be set independently for each marker by using the Marker Quick Menu.
▪Clear Scroll to @ on Snap - Clears this setting for all enabled markers. This can also be set independently for each marker by using the Marker Quick Menu.
The remaining items are visible depending on the current settings of all enabled markers.
▪Clear Compliments - If any enabled marker is split into the Main/Complement pair, the complement will be removed. This can also be done for specific markers by using its Quick Menu.
▪Lock All Split Pairs - This will lock the distance between the Main/Complement pair of any split marker. This can also be done for specific markers by using its Quick Menu.
▪Unlock All Split Pairs - This will unlock the distance between the Main/Complement pair of any split marker so that each half can move independently. This can also be done for specific markers by using its Quick Menu.
Drag to Place
Simply click on a marker and drag it to the area of interest. You can grab the marker itself (the vertical line in the waveform area) or its 'flag'. When your mouse is in the capture zone for a marker, the cursor changes to indicate that it is over a marker. The cursor also indicates which marker will be selected, making it easier to grab a specific marker when they are very close together (or even on top of each other). If the marker is off-screen or not visible, use the Quick Select flags to grab the marker and place it.
Auto Snap
'Snapping' the markers to signal edges makes it easy to measure the time between them or to bring a specific edge to the center of the window. This operation is used so often that we optimized it by making it an automatic function. When you are dragging a marker and your mouse is over a waveform, the cursor changes to a 'snap-left' or 'snap-right' arrow. The direction of the arrow shows you which edge (previous or next) of this waveform the marker will 'snap' to if you were to drop it at that point. The arrow will point to the nearest edge or to the nearest edge in the direction of mouse movement, even if that edge is off-screen.
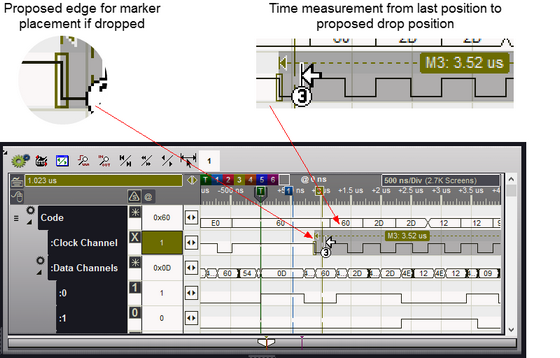
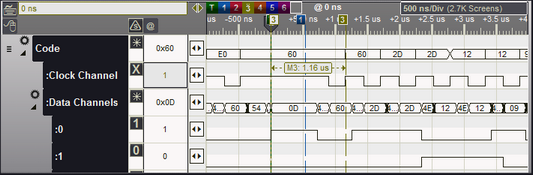
The time from the marker's last position is measured to the proposed drop point even if one or both points are off screen. In the graphic above, the marker's last position was off screen. Using the Quick Select flags we performed a marker drag on M3 and are moving it to the left over signal "CODE: Clock Channel". The snap indicator is drawn around the previous signal edge since we are moving to the left.
The Marker column changes to the marker's color indicating the marker is now assigned to that signal.
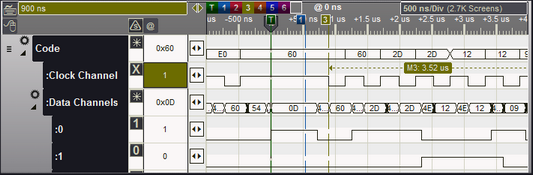
After releasing the mouse button, the marker snaps to the proposed edge and the time between the marker's current position and the center Time Reference point (@) is displayed in the upper left corner using the marker's color. Below, we see this measurement to be 900ns. We also see the measurement from the marker's last position to its current position just above the signal's waveform. Below, we see that measurement as 3.52 us.
If you DO NOT want to SNAP, but rather wish to drop the marker exactly at the mouse position, you can either hold down the Control key or move your mouse above or below all waveforms before releasing the mouse button.
Snap and Measure
'Snapping' markers to signal edges makes it easy to measure time between them or to bring a specific edge to the center of the window (when "Scroll to @ on Snap" is enabled). When a marker is assigned to a signal, the marker column uses the same color as the marker. To snap to the previous or next edge, use the left or right mouse button respectively. In the graphic below we Right-Clicked in the marker column, causing the marker to snap to the next edge of the signal and measure the time from its last position (also see: Snap and Value columns ).
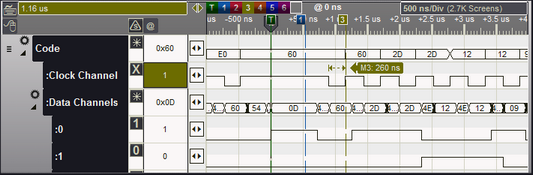
To assign the marker to another signal, Left-Click in the marker column of another signal. The first click assigns the marker. Any additional clicks will perform snap operations. If you drag a marker over a signal it automatically becomes the assigned signal.
Split Marker
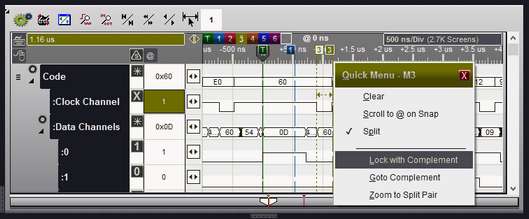
All main markers (M1 - M6) can be split form a tethered marker pair (a Main Marker and its Complement). To split a marker, Right-Click on the marker's flag and select "Split".

When splitting a marker, its complement is placed at the Center Time reference (@) and the Complement marker is activated as the "Active Marker", meaning all indicators that reference the active marker will now display in reverse colors since complements use the inverted color of their main marker. If we select the main marker all indicates will return to the main marker's colors. The time measurement now reflects the time between the pair.
If you look closely at the Quick Select flag for M3 you will see two small dots above it. This indicates the marker is split and each half can move independently.
To lock the pair, move the markers to the desired position, Right-Click on the marker's flag and select the "Lock" item. The selection text will be "Lock with Complement" if you clicked on the main marker's flag, but will be "Lock with Main Marker" if you clicked on the Complement's flag.
After selecting lock, the marker pair will always move together no matter which of the pair is the active marker. This includes dragging, snapping and placement by other means such as a search result (see Searches). The two dots above the Quick Select flag will be connected to indicate the split pair is locked.
The graphic below shows how the distance between the two markers remains the same even after we snap the main marker several edges to the right. You can use this technique to readily compare a time span of multiple points in the captured data without having to mark or remember the precise period of each.
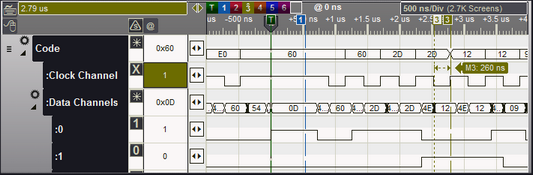
If you look closely at the Quick Select flag for M3 you will see a ^ symbol above it. This indicates the marker pair is locked and will move together.