Several Environment options are available and can be accessed from Main Menu-> Configure-> Environment.
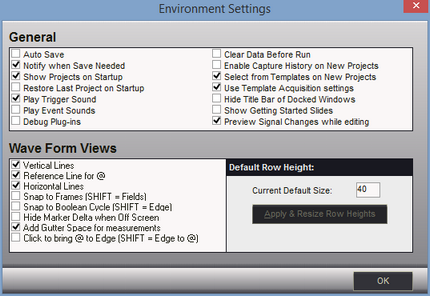
General
Auto Save - Select this option to automatically save the current file. All current settings and data will be saved to the file when exiting the program or opening another file. The "Notify when Save Needed" option is disabled when this option is enabled. (see also: Project Operations )
Notify when Save Needed - Select this option if you want to be notified of unsaved changes before exiting the program or opening another file. The "Auto save" option is disabled when this option is enabled. (see also: Project Operations )
Show Projects on Startup - Selected by default, this option presents a Choice of items to load when the software is launched. De-select this option to skip the Project Selections window on startup. If disabled, the "Restore Last File on Startup" option will be enabled.
Restore Last File on Startup - Select this option to skip startup options and automatically load the last file used previously. If disabled, the "Show Projects on Startup" option will be enabled. If the last file used is missing when launching DigiView with this option enabled, then the Project Selections window will still open. A project must be opened or created for the software to operate.
Play Trigger Sound - Selected by default, this option causes the software to present an audible indication of Trigger events. In continuous run mode, the alert will sound only once on repeated trigger conditions. De-select this option if you do not want the audible alert. The Audible sound can be customized by using the Operating systems "Sounds" control applet.
Play Event Sounds - Selected by default, this option causes the software to present an audible indication of any Snap or Scroll events. De-select this option if you do not want the audible alert. The Audible sound can be customized by using the Operating systems "Sounds" control applet.
Debug Plug-ins - Select this option to have the DigiView software pause when loading a custom plug-in. A message dialog will open and DigiView execution will wait until you close the dialog. This provides a means for the developer to attach the DigiView process to an external debugger before the plug-in module begins to execute.
Clear Data Before Run - Select this option to clear the display of all captured data when the Run or Auto Run button is pressed. This will clear the captured data if it was NOT already saved to the Capture History.
Enable Capture History on New Projects - Select this option to enable the Capture History when creating a new project. (see Creating a New Project )
Select from Templates on New Projects - Select this option to show the Template Selection window when creating a new project. (see Creating a New Project )
Use Template Acquisition Settings - Select this option to use the Acquisition settings of the template chosen for a New Project. Deselect to use the default settings instead. (see Acquisition Options )
Hide Title Bar of Docked Windows - This option toggles the visibility of the title bar of all docked windows. This is useful to preserve space in the docking areas or to eliminate unneeded labels for a cleaner user interface. The title of the docked window is always available by moving the mouse over the window's menu button.
Show Getting Started Slides - Select this option to see the getting started slides when launching the application. These are important hints that provide information necessary for getting the most out of using our software.
Preview Signal Changes while editing - With very large captures (10 Million transitions or more), signal and display updates can be noticeably slow while editing a signal and previewing the changes. Deselect this option to disable the automatic preview. This option as well as a manual "Refresh" button is available in the editor.
Vertical Lines - Check this option to display vertical lines at the time divisions in the Wave Form views.
Reference Line for @ - Check this item to display a vertical line at the time reference marker (@) of the Wave Form views.
Horizontal Lines - Check this option to display a horizontal line beneath each visible signal in the Wave Form views. This may be desired to help determine the state of multiple Boolean signals when zoomed in at maximum resolution.
Snap to Frames - Check this option to snap to frames by default and use the shift key to snap to fields. If unchecked, the default is to snap to fields and use the shift key to snap to frames. This option affects all marker and signal snapping features of Signals with Frame information in the waveform view.
Snap to Boolean Cycle - Check this option to snap to the next Cycle by default and use the shift key to snap to the next Edge. If unchecked, the default is to snap to the next Edge and use the shift key to snap to the next Cycle. This option affects all marker and signal snapping features of Boolean signals in the waveform view.
Hide Marker Delta when off screen - When a marker is snapped or dragged to a new position, or when a marker is split into two markers (marker complement), a time measurement is displayed from the last position to the new position or between the marker pair. This is the Marker Delta. When the time points of the Marker Delta are off screen, the measurement is still visible on the edge of the Waveform View in the direction of the Marker's position. Check this option to hide this measurement when the Delta points are not in the viewing area of the Waveform View.
Add Gutter Space for measurements - When selected, the height of each row will be increased to accommodate an empty space reserved just for measurements. This provides room above a signal's waveform to display any measurements (Instant, Quick, Marker), keeping the waveform visible at all times. This setting is ignored when a signal is configured for plotting.
Click to Bring @ to Edge - When the mouse is clicked in a Waveform view it will scroll that point to the Center Time Reference location ( @ ). If near a change in a signal, it will scroll the time of the change to the Center Time Reference. If you select this option, the behavior changes to bring the Center Time Reference to the point clicked. Holding the Shift Key while clicking will perform the opposite of the selected function.
Reset Row Height - Click the "Apply" button to reset the heights of all signals in the Wave Form displays to the value entered as the Current Default size. Edit the current value to enable the "Apply" button.