Once signals and triggers are defined, you can capture a new buffer of data at any time by pressing the 'Run' or 'Auto Run' buttons. If you tire of waiting on a trigger or the Analyzer triggers but you tire of waiting for its buffer to fill, you can manually STOP the capture to transfer the buffer. When transferred to the screen, the capture is also stored in the capture history for later analysis (based on Acquisition settings).
If you have little or no activity after the trigger condition and find the need to manually halt the capture frequently, you may want to set a timeout period for automatic stopping the capture or reduce the Analyzer's buffer size (see Analyzer Buffer).

 Preview - This mode will automatically transfer data to the PC repeatedly even if a trigger condition has not been defined. This mode is very useful to Monitor signals while making connections and only utilizes a small portion of the hardware buffer. In this mode, the buffer size and duration of data collection is adjusted automatically to provide a "peek" of the logic activity and is not intended for normal data analysis. The result is a virtual "LIVE" mode that does not try to search the data (Auto Search windows) or store the data in the capture history. The data displayed will be discarded when the results of a normal Run (single shot) or Auto Run are displayed.
 Auto Run - This will "ARM" the hardware, wait for the trigger condition, automatically display the data and then re-arm to repeat the process until the Stop button is pressed. If you are waiting on a Trigger condition that you expected to occur, you can select the "Stop" button to view the data already collected (see Analyzer Options).
 Run - This will "ARM" the hardware and automatically display the data when the buffer is full or manually stopped. If you are waiting on a Trigger condition that you expected to occur, you can select the "Stop" button to view the data already collected (see Analyzer Options).
When you click on 'Run' (or Auto Run), you are actually arming the trigger circuit. After detecting the trigger condition, the hardware allows the buffer to continue past the pre-fill point and continues to capture until all buffers are full. After the remaining data in the hardware the buffer has been transferred to the PC, the hardware immediately resets and halts if you selected RUN. If you selected Auto-Run, the next capture begins.
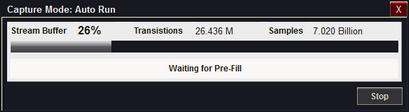
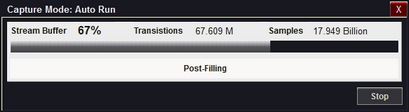
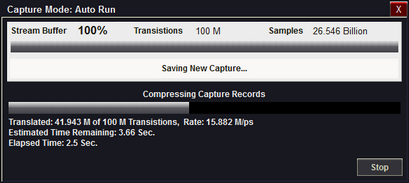
Capture Status Window
When capturing or previewing data, a window will open to display several statistics about the data, the buffer and anything involved with processing that data. The type of information displayed will depend on your project settings and the Capture mode. A few examples are displayed below.
Stopping the Capture
Press the Stop button to end the capture. If the button turns dark after selecting it without closing the window, the software is simply busy with a critical task. The request to stop has been seen and will be performed as soon as the time critical function is complete (such as Compressing the current capture or updating signals with the new data). You will only see this delay when capturing a very large amount of data (10 Million transitions or more).
Capture related topics:
(see also: Acquisition Options, Analyzer Options)